Goal
This document describes how to propose and submit code changes across multiple Git repositories together in Gerrit.
When to Use
Oftentimes, especially for larger code bases, code is split across multiple repositories. The Android operating system’s code base, for example, consists of hundreds of separate repositories. When making a change, you might make code changes that span multiple repositories. For example, one repository could define an API which is used in another repository. Submitting these changes across these repositories separately could cause the build to break for other developers.
Gerrit provides a mechanism called Topics to submit changes together to prevent this problem.
NOTE: Usage of topics to submit multiple changes together requires your Gerrit host having config.submitWholeTopic set to true. Ask your Gerrit administrator if you’re not sure if this is enabled for your Gerrit instance. |
What is a Topic?
-
A topic is a string that can be associated with a change.
-
Multiple changes can use that topic to be submitted at the same time (assuming approvals, etc.).
-
Submitting a change with a topic causes all of the changes in the topic to be submitted together
-
Topics that span only a single repository are guaranteed to be submitted together
-
Topics that span multiple repositories simply triggers submission of all changes. No other guarantees are given. Submission of all changes could fail, so you could get a partial topic submission. This is very rare but can happen in some of the following situations:
-
Storage layer failures. This is unlikely in single-master installation and more likely with multi-master setups.
-
Race conditions. Concurrent submits to the same repository or concurrent updates of the pending changes.
-
-
Here are a few intricacies you should be aware of:
-
Topics can only be used for changes within a single Gerrit instance. There is no builtin support for synchronizing with other Gerrit or Git hosting sites.
-
A topic can be any string, and they are not namespaced in a Gerrit instance; there is a chance for collisions and inadvertently grouping changes together that weren’t meant to be grouped. This could even happen with changes you can’t see, leading to more confusion e.g. (change not submittable, but you can’t see why it’s not submittable.). We suggest prefixing topic strings with the author’s username e.g. “username-” to help avoid this.
You can view the assigned topic from the change screen in Gerrit:

Topic submission behavior
-
Submitting a topic will submit any dependent changes as well. For example, an unsubmitted parent change will also be submitted, even if it isn’t in the original topic.
-
A change with a topic is submittable when all changes in the topic are submittable and all of the changes’ dependent changes (and their topics!) are also submittable.
-
Gerrit calls the totality of these changes "Submitted Together", and they can be found with the Submitted Together endpoint or on the change screen.

-
A submission creates a unique submission ID (
submission_id), which can be used in Gerrit’s search bar to find all the submitted changes for the submission. This ID is relevant when reverting a submission.
To better underestand this behavior, consider this following example.
Example Submission

-
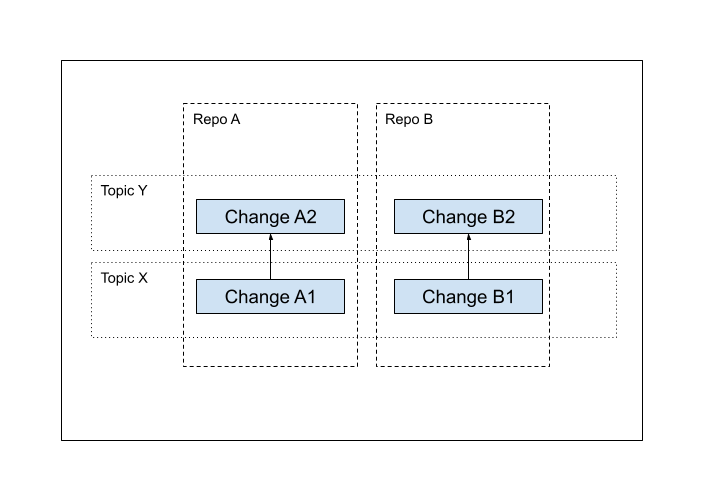
Two repositories: A and B
-
Two changes in A: A1 and A2, where A2 is the child change.
-
Two changes in B: B1 and B2, where B2 is the child change.
-
Topic X contains change A1 and B1
-
Topic Y contains change A2 and B2
Submission of A2 will submit all four of these changes because submission of A2 submits all of topic Y as well as all dependent changes and their topics i.e. A1 and topic X.
Because of this, any submission is blocked until all four of these changes are submittable.
Important point: B1 can unexpectedly block the submission of A2! This kind of situation is hard to immediately grok: B1 isn’t in the topic you’re trying to submit, and it isn’t a depnedent change of A2. If your topic isn’t submittable and you can’t figure out why, this might be a reason. |
Submitting Changes Using Topics
1. Associate the changes to a topic
The first step is to associate all the changes you want to be submitted together with the same topic. There are multiple ways to associate changes with a topic.
From the command line
You can set the topic name when uploading to Gerrit
$ git push origin HEAD:refs/heads/master -o topic=[YOUR_TOPIC_NAME]
OR
$ git push origin HEAD:refs/for/master%topic=[YOUR_TOPIC_NAME]
If you’re using repo to upload a change to Android Gerrit, you can associate a topic via:
$ repo upload -o topic=[YOUR_TOPIC_NAME]
If you’re using depot_tools to upload a change to Chromium Gerrit, you can associate a topic via:
$ git cl upload --topic=[YOUR_TOPIC_NAME]
From the UI
If the change has already been created, you can add a topic from the change page by clicking ADD TOPIC, found on the left side of the top of the Change screen.

2. Go through the normal code review process
Each change still goes through the normal code review process where reviewers vote on each change individually. The changes won’t be able to be submitted until all changes in the topic are submittable.
The requirements for submittability vary based on rules set by your repository administrators; often this includes being approved by all requisite parties, passing presubmit testing, and being able to merge cleanly (without conflicts) into the target branch.
3. Submit the change
When all changes in the topic are submittable, you’ll see SUBMIT WHOLE TOPIC at the top of the Change screen. Clicking it will submit all the changes in "Submitted Together."

Reverting a Submission
After a topic is submitted, you can revert all or one of the changes by clicking the REVERT button on any change.

This will give you the option to either revert just the change in question or the entire topic:

Reverting the entire submission creates revert commits for each change and automatically associates them together under the same topic. To submit these changes, go through the normal review process.
When submitting a topic, dependent changes and their topics are submitted as well. The RevertSubmission creates reverts for all the changes that were submitted at that time. When reverting the submission described in Example Submission, all 4 of those changes will get reverted.
NOTE: We say “reverting a submission” instead of “reverting a submitted topic” because submissions are defined by submission id, not by the topic string. So even though topics names could be reused, this doesn’t effect reverting. For example: 1. Submission #1 uses topic A 2. Later, Submission #2 uses topic A again Reverting submission #2 only reverts the changes in that submission, not all changes included in topic A. |
Cherry-Picking a Topic
You may want to cherry-pick the changes (i.e. copy the changes) of a topic to another branch, perhaps because you have multiple branches that all need to be updated with the same change (e.g. you’re porting a security fix across branches). Gerrit provides a mechanism to create these changes.
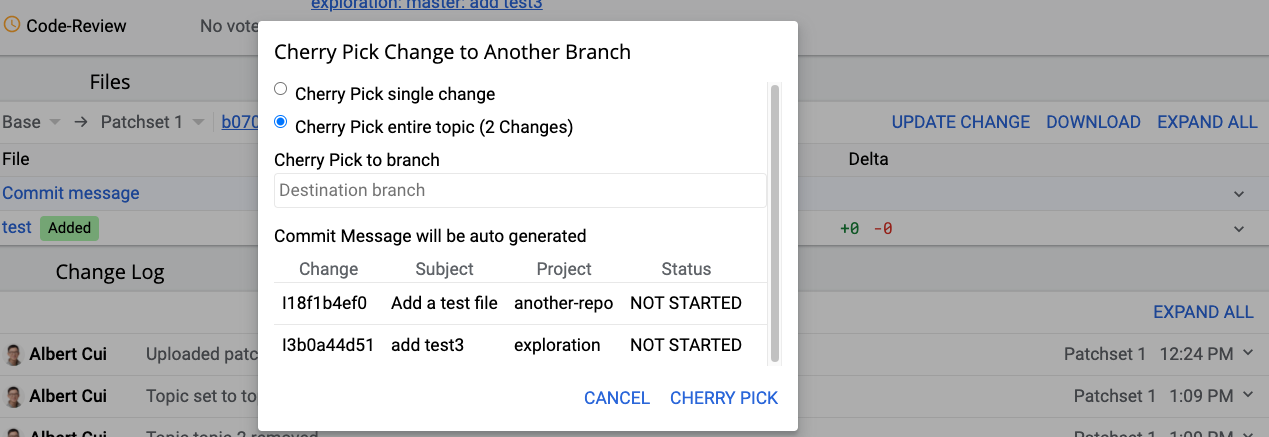
From the overflow menu (3 dot icon) in the top right of the Change Screen, select “Cherry pick.” In the screenshot below, we’re showing this on a submitted change, but this option is available if the change is pending as well.

Afterwards, you’ll be presented with a modal where you can “Cherry Pick entire topic.”

Enter the branch name that you want to target for these repositories. The branch must already exist on all of the repositories. After clicking “CHERRY PICK,” Gerrit will create new changes all targeting the entered branch in their respective repositories, and these new changes will all be associated with a new, uniquely-generated topic name.
To submit the cherry-picked changes, go through the normal submission process.
NOTE: You cannot cherry pick two or more changes that all target the same repository from the Gerrit UI at this time; you’ll get an error message saying “changes cannot be of the same repository.” To accomplish this, you’d need to do the cherry-pick locally. |
Searching for Topics
In the Gerrit search bar, you can search for changes attached to a specific
topic using the topic operator e.g. topic:MY_TOPIC_NAME. The intopic
operator works similary but supports free-text and regular expression search.
You can also search for a submission using the submissionid operator. Topic
submission IDs are "<id>-<topic>" where id is the change number of the change
that triggered the submission (though this could change in the future). As a
full example, if the topic name is my-topic and change 12345 was the one that
triggered submission, you could find it with submissionid:12345-my-topic.